Monday 22 June 2015

Saran Wrap Mani

Hey guys!!! Hope you all are well and having a good Ramzan

In today's post I'll be showing you how to creat a fun and cute look with just a piece of plastic wrap. The end result is so pretty and it honestly reminds me of tye dye and peacock feathers! So let's get started! :D


Things you're going to need:

1. a white nail paint (optional but its recommended that you do use it)
2. 3-4 colours of your choice (I chose blue, green, yellow and pink)
3. peel-off polish/tape (scotch tape, duct tape or any other)
4. Saran/Plastic wrap
5. nail polish remover and some q-tips
6. toothpicks (optional; help in clean-up)


Now to begin with, paint your nail white. After it has fully dried, paint the skin around your nails with a peel-off polish as shown. This is very helpful since it reduces the cleanup work left at the end of the mani. If you don't have a peel-off polish, some scotch tape would work just fine. 


Next, after the peel off has dried or you have placed the scotch tape around your nail, unscrew all of your nail polish bottles. Remember we have to work fast in this mani. Now cut out a piece of saran wrap and place your finger on it as shown and begin placing blobs of polish on your nail.


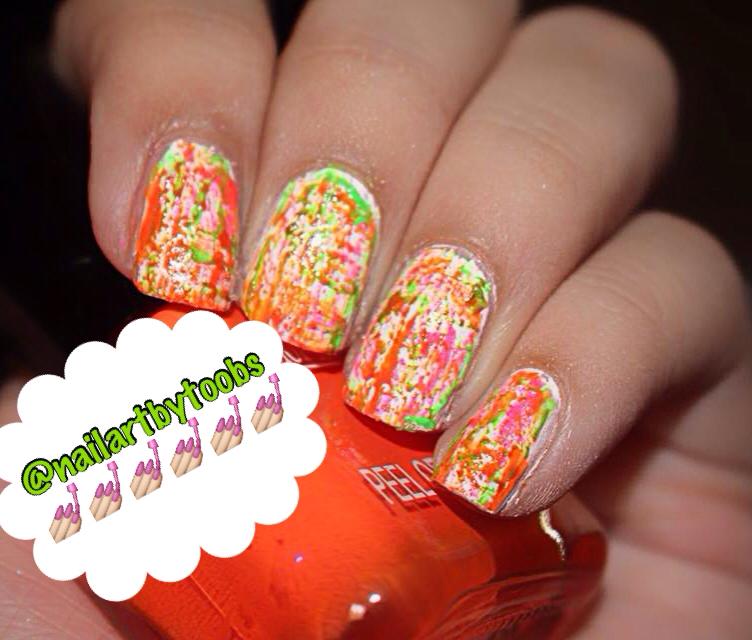
If you feel like some colour doesn't show, place more blobs of that colour. Now, take the saran wrap and press it on your nail. this will smudge all the colours together like this. 


Remove the saran wrap and use a toothpick to remove polish from the edges. It is desirable that you do this so as to get a cleaner look.


Then begin removing the peel-off polish from your skin. It will come off in a layer and save you a ton of time when it comes to cleaning. Same goes for tape. If there's still polish on your skin, remove it with a q-tip dipped in remover. After your nails have dried proceed with topcoat.


Checkout my full version! :D


I REAAAAALLY like how the ring finger turned out! *____*


Aaalright lovelies that's it for today! If you guys try out this design then do send me your recreations on Instagram on http://instagram.com/nailartbytoobs. You will also find more nailart designs on this page. Also, don't forget to follow me on Google+ (option at top left of this page) so you never miss a post!
Have a blessed Ramzan and a good day!
Lots of love,
Tooba K.


Wednesday 10 June 2015

3 Easy No Tools Needed Designs (wohoooooo)


Hey guys! I have some nail polish on my nails which has to be 100% dry before I start working on them and so I decided to start with this post while it dries! As the heading of this post suggests, todays blog will be about three easy designs which can be done with the polish brush alone. Exciting no???? So LETS AGET STARTEEEEDD!!!


1. First up is the Dry Brush Nailart Technique. For this design, start off by painting your nails a base colour (preferrably white, to let the colours pop!). Then take your second colour and wipe off the polish from the brush. You can do this by cleaning it on the opening of the bottle as shown or as I like, wiping the brush on a piece of scratch paper.


 Keep doing this till there is almost no polish left on the brush. Now swipe the brush on your nail in vertical and horizontal movements. Then do the same with the rest of your colours. You can use as many colours as you want but I decided to use three neons for my version. Check it out!


Remember to apply topcoat once you're satisfied with your nails!


2. Next up is a very cute Blobbicure. All you need to do is paint your nail a thick coat of your base colour and then, without giving it any time to dry, take your second colour and place blobs of polish on your nail randomly. You will see the blobs spreading in different directions. And thats it! You can turn this mani into a giraffe print design by using shades of yellows and browns.

My version:

How cute is this???? *_____*

A total down side of this mani however, is the amount of time it takes to dry. You have to give it ATLEAST 30 minutes to dry completely. Once its dry, proceed with topcoat.

3. Third, and also my all time favourite is the Fishtail Design. Yessss you read it correct! FISHTAIL pattern it is!
So start off by choosing 3 colours from your collection and use one of them to serve as base colour. After it has dried, take your second colour and swipe it from the corner of the cuticle and across the nail as shown:


Then, go in with your third colour and swipe the brush from the opposite corner like this:


 Now take your base colour and do the same from the opposite side like this:


Keep on doing this till the whole of your nail is covered. Make sure that each layer is almost or completely dry before proceeding on to the next one. Once you're done, seal your design with topcoat for a long lasting finish.

I reaaaaalllly loved my version of this!:D


Aaand that's it for today! Hope you guys love these easy and fun manis as much as I do! Make sure to leave your email ID in the box on the right so you never miss a post!

 To checkout more of my designs, head over to https://instagram.com/nailartbytoobs/.

Thanks for reading and have a good day!
Love,
Tooba K.


Disclaimer: I don't claim the originality of any of my designs unless stated otherwise.