Showing posts with label beauty. Show all posts

Thursday, 11 February 2016

INGLOT NAIL POLISH REVIEW

Hey guys! Today I wanted to do a review on the ONLY Inglot polish that I have! You can find their products at their very own shop in Ocean Mall, Karachi. So I actually didn’t buy my polish from Pakistan but my sister got it for me from Dubai. I am not sure about the prices in Dubai but in Pakistan the nail polishes are SUPER pricey.I don't remember what exactly the price is in Pakistan but it is well above Rs.1000.

But in my opinion, the price is justifiable with the amazing quality of their nail polish. I’ve had this one for almost a year now and the last time I used it was months ago. Unlike regular, cheap polishes, the formula is just as thin as it was when the polish was new. Sure the oil had resurfaced on the top but a good shake did the magic!

Formula

I’ve only used one polish by Inglot but I’m already a fan! The formula is super pigmented and very manageable. It does not get thick with time as you would expect. I have used a ton of polishes by different brands, even OPIs, and none of them have stayed in such perfect condition as this one. I must also mention that I hadn’t used this polish in over 3 months but it still stayed thin unlike regular polishes. I’ve also tried the formula in water and it spread perfectly in water (although I would never use a polish as expensive as this one for water marbling :p).

Brush

The brush is out of this world! Unlike OPI and Colour Studio, it’s thin and helps steer the polish in the desired direction easily. The best part about the brush is that it allows one to apply the polish without any mess even on short nails. I personally find handling thick brushes difficult (which of course varies from person to person) which is why the Inglot brush has become my absolute favourite.

Staying time
The staying time of this polish is just OK. But to be fair, I did not use a top coat to seal it in. Personally, I feel however good the formula is, the polish will eventually chip away because our hands are the most used parts of our body. So with them on the go 24/7, it is only justified if it does peel away.


Here's a swatch!

FINAL VERDICT: 10/10 (yes I loooooove this polish) :p

Sooo that's it for today, my lovelies! Hope you has as much fun reading this as I had writing it up! Let me know what else you guys thin about this polish in the comments below!


Thank you for reading and have greeeeaaat day!
Love,
Tooba.


Saturday, 9 January 2016

Beauty Hacks


Do you ever just forget to grab a new bottle of nail polish remover from the drug store or just completely RUIN your make-up because of uneven eyeliner wings?? Well worry no more! Here are some quick fixes to perfect those wings, remove your nail colour and much more!!! :D

1. Use tape for perfect winged liner!

This one is for all of us who suck at creating the perfect wings for our liner. Use a piece of tape and place it diagonally on the corner of your eye and then apply the liner. The tape can also help to create a perfect eye shadow line.


Here's the finished look in case you're wondering. :p
2. Broke a lipstick? Fix it with a lighter!

OK, so I would've uploaded a gif for this one but I actually burnt my finger in the process. So don't say i didn't warn you! :p

So place the broken piece of the lipstick on its base and use the lighter to melt the lipstick. As it melts, the piece will automatically re-attach to the base. Be careful while melting the lipstick and don't let it drip on your finger or hand or you'll burn yourself really badly. Also, melting the lipstick to much can ruin its entire shape so don't over do it. Keep a tissue at hand in case of any mess and tadaaaa, you've fixed your favorite lipstick!! :D 

3. Got awful teeth stain? Use this!

This is an absolute favourite of mine! Mix some baking soda, salt and 2-3 drops of lemon juice. Brush your teeth with the mixture thrice a week. The acidic properties of all three ingredients work well together to rid the teeth of yellowness and stains. Do NOT do it on a daily basis as baking soda can ruin your teeth enamel. As you begin to see results, reduce the use to once a week because again, it can be unhealthy for the enamel.

4. Bad at painting your nails? Use Vaseline on your skin for easy removal! 

If you are really bad at painting your nails, worry no more! Just apply some Vaseline on the skin around your nails before painting them. Then when you're done, use a toothpick to gently remove the nail polish from your skin. The Vaseline does not allow the polish to adhere to your skin therefore making it easy to remove. I love using Vaseline when painting with my non-dominant hand because it makes nail painting so much easier ad fun!!!

5. Clean lipstick brush with alcohol swab


What do you use for cleaning your lipstick brush? Water? Well good luck with that, you! The quickest way to clean your lipstick brush is to use an alcohol swab. Just rub your brush on it and one swab later, your brush is as clean as new!!!


6. Golden eye shadow for highlighting!!!

OK I know there's an actual product called a 'highlighter' for highlighting but a golden eye-shadow can do wonders! Infact, using a highlighter with the eyeshadow would give an even better effect. Just apply the eye shadow to the highest points of the face like the nose, cheeks,cupid's bow etc, basically all the points where you apply highlighter. Usually, this is enough, but if you want to make your face even more glowy, top off the look with a highlighter. I like using the golden shade " Half Baked" from Urban Decay's Naked palette 1.

7. Out of nail polish remover? Use perfume!

Alright, this actually happens ALOT with me! So, the next best alternative to remover is some perfume or deodorant! This is obviously not something you should do often but in emergencies it can totally help! Happy Removing!! :pp


8. Beauty Blender cleaning!

Most of us absolutely hate this part of our makeup routines but it has to be done! The most annoyinging part of cleaning is when it comes to beauty blenders or makeup sponges. A lot of makeup artists like microwaving their sponges in a plastic container for 30 seconds or more. Then, take some soap and use it to clean the sponge. You do NOT want to concentrate on one region, perhaps where there is a foundation patch. This can ruin the sponge. Just be gentle. Keep squeezing the sponge to rid it of the water and the foundation. After its clean, dip it in water and squeeze it multiple times. You want to make sure there is no soap left in the sponge since this can encourage fungal growth.


Here's the water. You're welcome! :p


9. Out of makeup wipes/remover? Use lotion!!!

One of my favourite ways to remove makeup is to use some lotion! This way, I don't have to scrub the makeup off my face and leave my already dry skin extra dry and stingy. Also, it helps me get some use out of those completely useless lotions which do nothing except smelling really nice. Haha!


10. Out of toner? What is apple vinegar for???? :D

Apple vinegar has TONNES of uses and one of them is as toner! Soak a cotton ball in a mixture of one tablespoon vinegar and two cups water and rub it gently on your face. The acetic properties of apple cider vinegar will reduce the size of your pores, improve blood circulation along with tightening the skin! Basically, it will work better than a toner! HAHA 

Hope you find these tips and tricks helpful! If you have some of your own, do leave them down below in the comment section as I would love to know them! You can also follow me through Google+ by dropping your email in the box on the top left of this page! Thank you for reading and have a great day!

Lots of Love

Tooba K.

Thursday, 2 July 2015

Cheetah Print Design

Hey guys! Today i decided to do a post on one of my favourite nailart designs. The Cheetah Print! So lets get staaaaarteddd!!!

Start off by choosing any two colours of your choice and a black polish. I chose a peach and silver shade. You will also need a toothpick for this look. Now, paint your nails with one of the two colours you chose. 


After your base has dried, take your second colour and place random dots all over your nail as shown. Make sure they aren't HUGE blobs just medium sized ones which will dry fast.


Now take your toothpick and dip it in the black polish. Outline the spots you place before with the black. Make 'C' shapes around them and give random breaks in between as shown. Do this to all the spots,


Then place some random shaped spots in black in the empty spaces like this. 


After you're done, you wanna give your nails ATLEAST 30 minutes to dry. This is important because if you hurry with the topcoat, the black on the nails will smudge. Also, there's always a chance of smudging even if you have given your nails an ample amount of time to dry. So be generous with the topcoat. Apply alot of it on each nail and gently drag it across like so.


Check out my full version! :D


Soooo that's it for today ladies! If you wanna checkout more of my designs, head over to http://instagram.com/nailartbytoobs. I might be conducting a giveaway soon so you may as well follow me to stay updated. Also, don't forget to follow me on Google+ (option at top right) so you never miss a post!

Take care and have a great day!
Lots of Love
Tooba K.


Wednesday, 10 June 2015

3 Easy No Tools Needed Designs (wohoooooo)


Hey guys! I have some nail polish on my nails which has to be 100% dry before I start working on them and so I decided to start with this post while it dries! As the heading of this post suggests, todays blog will be about three easy designs which can be done with the polish brush alone. Exciting no???? So LETS AGET STARTEEEEDD!!!


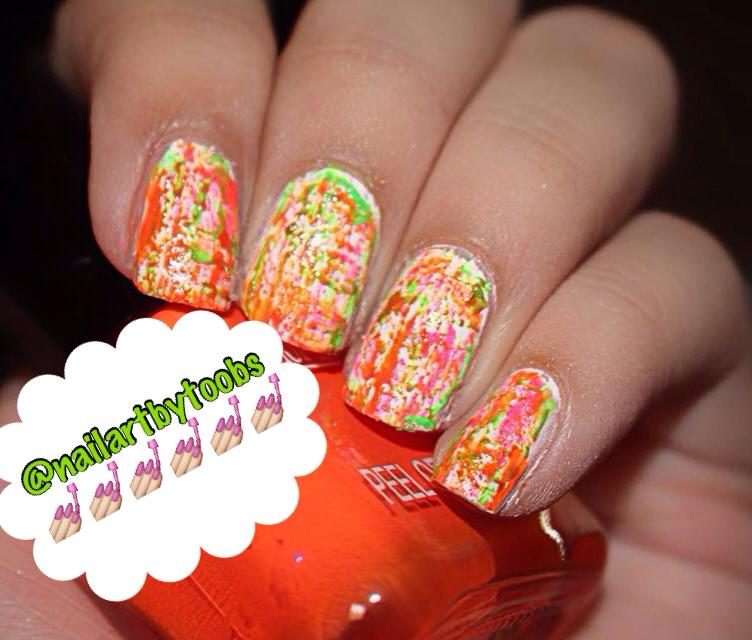
1. First up is the Dry Brush Nailart Technique. For this design, start off by painting your nails a base colour (preferrably white, to let the colours pop!). Then take your second colour and wipe off the polish from the brush. You can do this by cleaning it on the opening of the bottle as shown or as I like, wiping the brush on a piece of scratch paper.


 Keep doing this till there is almost no polish left on the brush. Now swipe the brush on your nail in vertical and horizontal movements. Then do the same with the rest of your colours. You can use as many colours as you want but I decided to use three neons for my version. Check it out!


Remember to apply topcoat once you're satisfied with your nails!


2. Next up is a very cute Blobbicure. All you need to do is paint your nail a thick coat of your base colour and then, without giving it any time to dry, take your second colour and place blobs of polish on your nail randomly. You will see the blobs spreading in different directions. And thats it! You can turn this mani into a giraffe print design by using shades of yellows and browns.

My version:

How cute is this???? *_____*

A total down side of this mani however, is the amount of time it takes to dry. You have to give it ATLEAST 30 minutes to dry completely. Once its dry, proceed with topcoat.

3. Third, and also my all time favourite is the Fishtail Design. Yessss you read it correct! FISHTAIL pattern it is!
So start off by choosing 3 colours from your collection and use one of them to serve as base colour. After it has dried, take your second colour and swipe it from the corner of the cuticle and across the nail as shown:


Then, go in with your third colour and swipe the brush from the opposite corner like this:


 Now take your base colour and do the same from the opposite side like this:


Keep on doing this till the whole of your nail is covered. Make sure that each layer is almost or completely dry before proceeding on to the next one. Once you're done, seal your design with topcoat for a long lasting finish.

I reaaaaalllly loved my version of this!:D


Aaand that's it for today! Hope you guys love these easy and fun manis as much as I do! Make sure to leave your email ID in the box on the right so you never miss a post!

 To checkout more of my designs, head over to https://instagram.com/nailartbytoobs/.

Thanks for reading and have a good day!
Love,
Tooba K.


Disclaimer: I don't claim the originality of any of my designs unless stated otherwise.